Splitting strings in maps on BizTalk Server has become much simpler with the introduction of XSLT 2.0 in BizTalk 2020. In previous versions of BizTalk Server, one way to accomplish this, was to use recursive templates. In many cases, this can now be avoided by using XSLT 2.0 and the tokenize() function.
Let’s say you have the following XML document, and want to split the text into separate lines based on the semicolon delimiter:
By using XSLT 2.0, you can now add code similar to the following in an Inline XSLT Scripting Functoid, and connect it to the root of your output schema:
Notice that this example isn’t optimized, but focused on clarity. There are also a lot of different ways to use the tokenize() function that I’ll leave up to you to discover. You can read more about it here and here.
To be able to use XSLT 2.0 in BizTalk maps, you’ll have to set the XSLT transform engine of the map to Saxon 9 HE, like so:
Set Saxon 9 HE as the XSLT transform engine in BizTalk Server 2020.
The Saxon 9 HE engine even supports XSLT 3.0, so you can use the XSLT 3.0 syntax if you want to.
The above script should result in the following XML:
Note that, by using the Saxon 9 HE XSLT transform engine instead of the default .Net Framework engine, you may have to sacrifice the use of most functoids. That’s because Saxon 9 HE doesn’t support embedded scripting in the XSLT. For instance, any functoid that adds C# script code to the XSLT, will not work. Functoids that should work with Saxon 9 HE, include the Scripting functoid (only some script types) and other Advanced functoids.
BizTalk Health Monitor (BHM) is a very useful tool for checking the health of your BizTalk servers. Among the most useful features is what was formerly known as the BizTalk Terminator tool. You can download BHM here.
As you may already have noticed, it’s very easy to corrupt the installation of BHM. BHM includes a self-update feature, which in some cases will corrupt the installation if it fails. There are two common scenarios where this will happen:
The BHM update services in Azure are partly blocked by a firewall.
BHM is in use by another user when you try to update it.
If you’re affected by the first item in the list, you should never allow BHM to update itself. Unless you’re able to open the firewall, of course. If BHM is partly blocked by a firewall, it may automatically detect that updates are available, and ask if you want to download and install them. Do not accept this kind offer.
The BHM Update dialog.
So, if you’re unable to open the firewall, what can you do instead to get BHM updated? The answer is provided with BHM itself:
Copy “ChkBHMRep.exe” and “Microsoft.WindowsAzure.Storage.dll” from the BHM installation folder to a machine without firewall issues.
Run ChkBHMRep.exe on the machine without firewall issues.
A subfolder called “Updated” is created. Copy the files from this folder to the BHM installation folder on the BizTalk server.
Re-register the BHM snap-in on the BizTalk server if “mbvsnapin.dll” or “MYHC.dll” was updated:
Open Command Prompt as Administrator.
Go to “C:\Windows\Microsoft.NET\Framework\v4.0.30319”.
Run the following command (assuming BHM was installed in the default location): InstallUtil “C:\Program Files (x86)\BizTalkHealthMonitor\mbvsnapin.dll”
The second item in the list is easier to avoid. Just make sure there are no users logged on to the server using BHM before you try to update it. Look for users in Task Manager that’re running “Microsoft Management Console (32 bit)”. This is just an indicator, as Management Console may be running snap-ins other than BHM.
Detect BHM in use from the Task Manager.
Example of an error that may occur when the BHM installation has been corrupted.
So, what do you do if your installation of BHM has already been corrupted?
Make sure no users are keeping locks on the BHM files.
Download BHM if you don’t already have the installation file.
Recently, I came across this error message on some BizTalk 2020 servers. You can see the full exception message including stack trace below. The error was thrown from send ports using the WCF-Custom adapter with the oracleDBBinding binding type, running on 32-bit hosts.
System.TypeInitializationException: The type initializer for 'Oracle.DataAccess.Client.OracleConnection' threw an exception. ---> Oracle.DataAccess.Client.OracleException: The provider is not compatible with the version of Oracle client
   at Oracle.DataAccess.Client.OracleInit.Initialize()
   at Oracle.DataAccess.Client.OracleConnection..cctor()
   --- End of inner exception stack trace ---
   at Oracle.DataAccess.Client.OracleConnection..ctor()
   at Microsoft.Adapters.OracleDB.OracleDBBinding.Initialize()
   at Microsoft.Adapters.OracleDB.OracleDBBinding.CreateBindingElements()
   at Microsoft.BizTalk.Adapter.Wcf.Runtime.WcfClient`2.InitializeValues(IBaseMessage message)
   at Microsoft.BizTalk.Adapter.Wcf.Runtime.WcfClient`2..ctor(IBaseMessage message, WcfTransmitter`2 transmitter)
   at Microsoft.BizTalk.Adapter.Wcf.Runtime.WcfTransmitter`2.GetClientFromCache(String spid, IBaseMessage message)
   at Microsoft.BizTalk.Adapter.Wcf.Runtime.WcfAsyncBatch`2.BatchWorker(List`1 messages)
Both 32- and 64-bit versions of Oracle client 12.1 were installed on the servers. In both the 32- and 64-bit .NET Framework 4 GAC, I found Oracle.DataAccess version 4.121.2.0. So far, everything seemed to be in order.
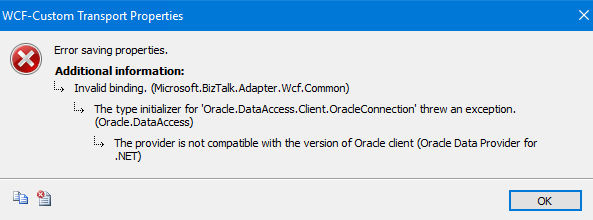
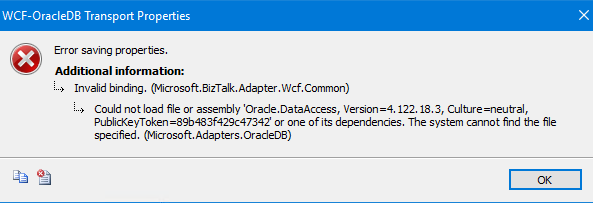
To check if there was any library or version conflicts on the servers, I tested creating new send ports using the WCF-OracleDB adapter and the WCF-Custom adapter with the oracleDBBinding binding type. This resulted in the following error:
TITLE: WCF-Custom Transport Properties
------------------------------

Error saving properties.

------------------------------
ADDITIONAL INFORMATION:

Invalid binding. (Microsoft.BizTalk.Adapter.Wcf.Common)

------------------------------

The type initializer for 'Oracle.DataAccess.Client.OracleConnection' threw an exception. (Oracle.DataAccess)

------------------------------

The provider is not compatible with the version of Oracle client (Oracle Data Provider for .NET)

------------------------------
BUTTONS:

OK
------------------------------
The next thing I tested, was running the 32- and 64-bit versions of tnsping. The 64-bit version was working correctly. However, the 32-bit version resulted in this error message:
Error message from running the 32-bit version of tnsping.exe.
This meant that for some unknown reason, the 32-bit version of MSVCR100.dll had gone missing from the BizTalk servers. And sure enough, the library was present in the System32 folder, but was missing from the SysWOW64 folder.
The solution was to install the Microsoft Visual C++ 2010 x86 Redistributable on the BizTalk servers. This restored the missing library in SysWOW64, and everything started working normally again. The latest redistributable can be downloaded from Microsoft here.
The lesson learned here, is that the underlying error is not always what the error message claims it to be. If you see an error message that claims your Oracle client version is not compatible, you may actually just be missing a library. My recommendation is to run tnsping, as this tool seems to report more accurate error messages.
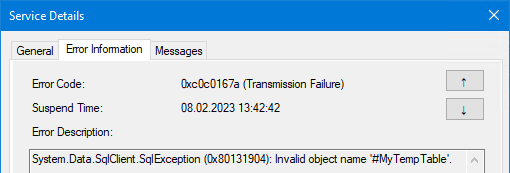
When you call a stored procedure from a receive location or send port on BizTalk Server through the WCF-SQL adapter, or the WCF-Custom adapter using the sqlBinding binding type, and you set the InboundOperationType as TypedPolling, you may get an exception – similar to the following – if the stored procedure is using temp tables:
System.Data.SqlClient.SqlException (0x80131904): Invalid object name ‘#MyTempTable’.
The same will happen if you try to generate a strongly-typed schema from the same stored procedure in Visual Studio using the Consume Adapter Service:
Generating a strongly-typed schema in Visual Studio from a SQL Server stored procedure using temp tables.
In short, what happens is that WCF (Windows Communication Foundation) calls the stored procedure twice. The first time, a strongly-typed schema will be generated. The second time, the stored procedure is executed.
When WCF generates the strongly-typed schema, the setting FMTONLY is set to ON so that only metadata is returned from the stored procedure. While doing so, temp tables can’t be created or inserted into. You can read more about FMTONLYhere.
To get around this, we can use the following trick to switch OFF the FMTONLY setting, so that the temp tables will be created, and data can be inserted into them.
DECLARE @FmtOnlyIsSet BIT = 0
IF 1 = 0
BEGIN
	SET @FmtOnlyIsSet = 1
	SET FMTONLY OFF
END

-- Write code here that creates temp tables and inserts data into them.

IF @FmtOnlyIsSet = 1
	SET FMTONLY ON

-- Return data here. This can select from the temp tables created earlier.
When FMTONLY is ON, all code paths are executed, regardless of any IF statements. This means that the IF 1 = 0 statement in the code above, will be ignored when WCF is generating the strongly-typed schema, and FMTONLY will be switched OFF. The @FmtOnlyIsSet flag is set so that we can switch FMTONLY back ON again later, which will ensure that the strongly-typed schema is generated from any metadata returned after this.
And, in the end, a little warning: Make sure you don’t make any unintended changes to data while FMTONLY is switched OFF, because that may corrupt your data and/or change the outcome of the stored procedure when WCF is calling it the second time!
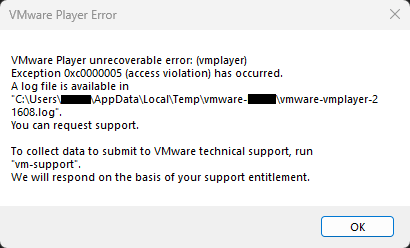
If you are running different versions of BizTalk Server on virtual machines using VMware Player, and your host OS is Windows 11, chances are that you’ve run into error 0xc0000005 by now. This error can have many causes, but as I understand it, it’s sometimes caused by VMware not supporting all virtualization features of the host OS and CPU.
I came across this error on a BizTalk Server 2013 VM running Windows Server 2012 as guest OS. My guess is that later versions of Windows will be affected as well. I’ve not encountered the error on VMs running earlier versions of Windows Server.
Looking at the error log of the VM when running under VMware Player 16, I found the following error message with a link to an article at VMware: “VMware Player does not support virtualized performance counters on this host. Refer to VMware KB article 81623 at https://kb.vmware.com/s/article/81623 for more details.”
To fix the error, I had to follow the steps below. The procedure is a bit different depending on whether or not you’ve enabled Hyper-V on the host OS. Please note that this may not fix the problem for you.
VMware Player 15/16
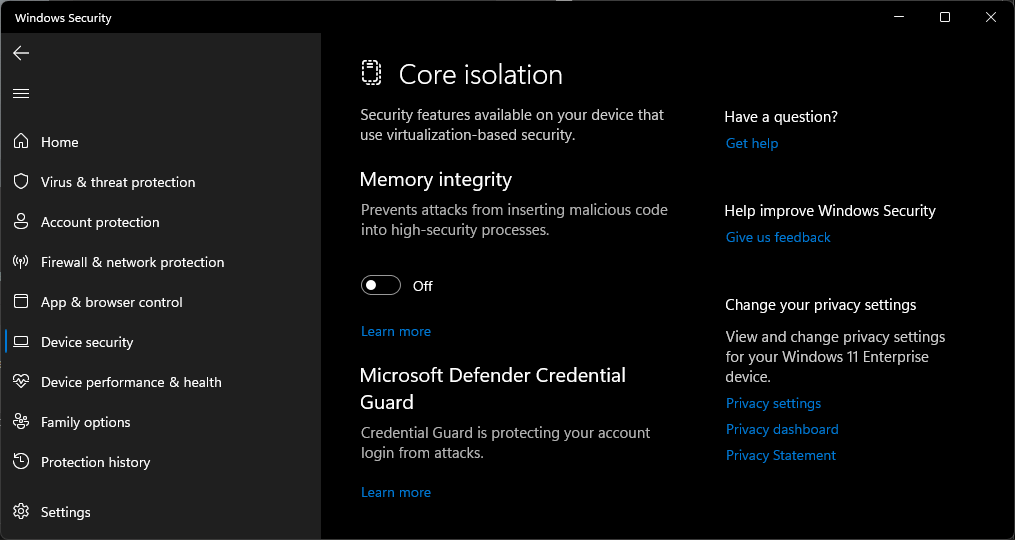
Deactivate “Memory integrity” in Windows 11 (host OS).
Open Settings > Privacy & security > Windows Security > Device security > Core isolation details
Turn off memory integrity:
Restart Windows 11 (host OS).
Alternatively, you can upgrade to VMware Player 17. I’ve tested this version to work with “Memory integrity” activated.
VMware Player with Hyper-V enabled
VMware Player supports Hyper-V from v15.5.5 and up.
Start VMware Player.
Make sure the VM in question has been powered off. You can do that from the Power menu in VMware Player.
Choose to edit virtual machine settings:
Edit virtual machine settings.
Select Processors on the Hardware tab:
Turn off virtualization settings of VM in VMware Player 16.
Deactivate “Virtualize Intel VT-x/EPT or AMD-V/RVI”.
Deactivate “Virtualize CPU performance counters”.
If this didn’t resolve the issue for you, reducing the number of processor cores to 1 may help. I’ve read that this has worked for some, however, I’ve not tested this myself.
If you’re running a version of VMware Player that doesn’t support Hyper-V, and Hyper-V is enabled on the host OS, you may need to disable Hyper-V entirely on the host OS. VMware Player, before v15.5.5, used a Virtual Machine Monitor (VMM) requiring direct access to the CPU and it’s built-in virtualization support. With Hyper-V enabled, VMM no longer has access to the virtualization features.
Update 2022.12.07: Added info. about WMware Player 17.
Today, I came across an error message in the Application log of the Event Viewer on BizTalk Server 2013 that I hadn’t noticed before. The error is actually a known issue in BizTalk Server 2013, but I decided to post it here anyways, since the resolution by Microsoft was a little bit off.
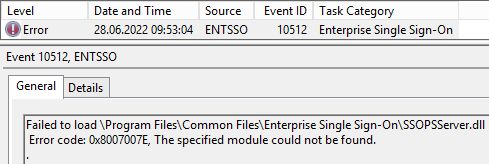
The error message was as follows, and it is logged every time Enterprise Single Sign-On is initialized on the server:
Failed to load \Program Files\Common Files\Enterprise Single Sign-On\SSOPSServer.dll
The error code 0x8007007E, and the error description “The specified module could not be found”, means that Enterprise Single Sign-On is looking for a dll that doesn’t exist.
The error is safe to ignore, according to Microsoft, but if you prefer to get rid of the error message, here’s how you do that:
Mount the original BizTalk Server 2013 installation media.
For 32-bit installations of SSO:
Locate the SSOPSServer.dll file here: \BizTalk Server\Platform\SSO\Files\
For 64-bit installations of SSO:
Locate the SSOPSServer.dll file here: \BizTalk Server\Platform\SSO64\Files\
Copy the SSOPSServer.dll for your system into the Enterprise Single Sign-On installation directory. This defaults to C:\Program Files\Common Files\Enterprise Single Sign-On\ on your BizTalk server.
For reference, here’s the version information of the SSOPSServer.dll for BizTalk Server 2013 (the versions are the same for the 32-bit and the 64-bit libraries, but the size differs):
SSOPSServer.dll version 9.0.1865.0.
The next time Enterprise Single Sign-On initializes, you will get the following informational message in the Application log instead of the previous error message:
Password sync services are available for this computer.
BizTalk Server 2020, according to the documentation, is compatible with Oracle client versions 12.1, 18.3 and 19.3. However, versions other than 12.1 are notoriously difficult to locate without an account at Oracle, and so you will often find that Oracle client 12.1 has been installed on BizTalk Server 2020 servers.
Normally, it’s not problematic running Oracle client version 12.1 on BizTalk Server 2020. Receive locations and send ports work as they should. Messages are received and transmitted without problems. It’s not until you try to create new, or make changes to, receive locations or send ports running the WCF-OracleDB or WCF-OracleEBS adapter, or the WCF-Custom adapter with an oracleDBBinding or oracleEBSBinding binding type, that you get an error message similar to the following:
Version 4.122.18.3 of the Oracle.DataAccess assembly could not be found.
This means that, while BizTalk Server 2020 is compatible with Oracle client version 12.1, the BizTalk Server Administration Console actually expects that ODAC version 18.3 is installed.
The workaround is to add assembly binding redirects to the machine.config files of .NET Framework 4. The BizTalk Server Administration Console is running as a 32 bit process, so you should only need to add the redirect to the 32 bit machine.config file, but I recommend adding it to the 64 bit file as well if the Oracle.DataAccess version 4.122.18.3 assembly is not installed in the 64 bit GAC.
To find out what versions of the Oracle.DataAccess assembly is installed, look in the following locations:
Where to find the installed version of the 32 bit Oracle.DataAccess.
If you find version 4.122.18.3 under GAC_32, you’re set, and you should not get errors in the BizTalk Server Administration Console. If you find version 4.121.2.0, ODAC 12.1 is installed.
If version 4.122.18.3 is not present, go ahead and add the assembly binding redirect to the applicable version of machine.config. You can find machine.config for .NET Framework 4 here:
Replace newVersion with the version of the Oracle.DataAccess assembly you have in your GAC.
When you’ve added the assembly binding redirect, save the changes, and then restart BizTalk Server Administration Console so that the changes can take effect.
This has been tested to be an issue in BizTalk Server 2020 with CU3 installed, which was the latest CU pack available at the time of writing, and Oracle client version 12.1. I cannot confirm that it’s an issue if Oracle client version 19.3 is installed, but it’s likely that BizTalk Server Administration Console will be bound to ODAC 18.3.
The other day, I was tasked with changing the user accounts on the host instances of a BizTalk Server environment. The environment consisted of two BizTalk servers, where some of the hosts were clustered. After stopping the host instances, it becomes a straightforward process if one follows Microsoft’s documentation on how to change service accounts and passwords.
However, when I tried to change the user account on a host instance of a clustered host, I got the following error message:
Error message displayed when you try to change the account on a host instance when the host is clustered.
The error message is fortunately pretty self-explanatory. It means that there’s a few extra steps that must be followed when changing the user account on a host instance when the host is clustered. The following steps will work on BizTalk Server 2013 and newer (I’ve not tested if it works on older versions).
Before the user account can be changed
Open Failover Cluster Manager on one of the BizTalk servers where you want to change user accounts. You can find it by searching for “Failover Cluster Manager” on the Start menu, or by going to “Administrative Tools”.
Once in Failover Cluster Manager, expand the cluster, and select Roles.
Roles in Failover Cluster Manager.
Select the clustered role that contains the resources you want to manage, and go to the Resources tab.
Resources of a role in Failover Cluster Manager.
Right-click on the role resource corresponding to the host instance that you want to change the user account on, and choose Take Offline from the pop-up menu.
In BizTalk Server Administration Console, select the clustered host, and choose Uncluster from the Actions menu.
Uncluster a clustered host in BizTalk Server Administration Console.
You can now follow Microsoft’s guidelines for changing the user account on the host instance.
After changing the user account on the host instance
In BizTalk Server Administration Console, select the host to you want to cluster, and choose Cluster from the Actions menu.
Cluster a host in BizTalk Server Administration Console.
Select the cluster resource group you want to add the host to from the drop-down list. When you click OK, the host will be clustered, and automatically brought online.
Choose the cluster resource group to add the host to.
In an earlier post, I guided you through creating a simple service behavior. This time, we’ll take a look at the endpoint behavior.
As an example, we’ll create an empty endpoint behavior – a template if you will – that, with some further development, can be used for inspecting and modifying a message. A typical usage scenario for an endpoint behavior would be to add an authorization header to a web service request. This has been tested to work on BizTalk Server 2013, and should work on newer releases as well.
Step 1: Create the behavior class
The first step is to create a class library with a class that implements the IClientMessageInspector and IEndpointBehavior interfaces. The class library must reference the libraries System.dll, System.Configuration.dll and System.ServiceModel.dll. The class constructor must accept any configuration properties that, in a later step, will be made accessible to the adapter GUI. Note that implementing the IClientMessageInspector interface isn’t required for creating an endpoint behavior, but it’ll be necessary if you’re implementing something like an authorization header injector.
using System.ServiceModel;
using System.ServiceModel.Channels;
using System.ServiceModel.Description;
using System.ServiceModel.Dispatcher;

namespace MyEndpointBehaviorNamespace
{
    public class MyEndpointBehavior : IClientMessageInspector, IEndpointBehavior
    {
        private string MyProperty { get; set; }

        public MyEndpointBehavior(string myProperty)
        {
            MyProperty = myProperty;
        }
    }
}
Step 2: Implement IClientMessageInspector
The following two methods, AfterReceiveReply and BeforeSendRequest, are implemented in the MyEndpointBehavior class. If you don’t wish to inspect or modify the request or reply message, you don’t need to add any code beyond what you see below, and if you don’t implement the IClientMessageInspector interface, you don’t need these methods at all. However, if you’re implementing an authorization header injector, that will have to be done in the BeforeSendRequest method.
public void AfterReceiveReply(ref Message reply, object correlationState)
{
}

public object BeforeSendRequest(ref Message request, IClientChannel channel)
{
    return null;
}
Step 3: Implement IEndpointBehavior
The ApplyClientBehavior method is the only method that’s needed for adding an endpoint behavior to the WCF client as a message inspector. The remaining methods can be empty. These methods must be implemented in the MyEndpointBehavior class.
public void AddBindingParameters(ServiceEndpoint endpoint, BindingParameterCollection bindingParameters)
{
}

public void ApplyClientBehavior(ServiceEndpoint endpoint, ClientRuntime clientRuntime)
{
    clientRuntime.MessageInspectors.Add(this);
}

public void ApplyDispatchBehavior(ServiceEndpoint endpoint, EndpointDispatcher endpointDispatcher)
{
}

public void Validate(ServiceEndpoint endpoint)
{
}
Step 4: Create the configuration element class
It’s time for creating a class that inherits from BehaviorExtensionElement. This class will make the configuration properties available to the adapter GUI, and is created in the same namespace as the behavior class.
using System;
using System.ComponentModel;
using System.Configuration;
using System.ServiceModel.Configuration;

namespace MyEndpointBehaviorNamespace
{
    public class MyEndpointBehaviorElement : BehaviorExtensionElement
    {
    }
}
Step 5: Implement the configuration elements
The following is implemented in the MyEndpointBehaviorElement class.
We start by implementing the configuration properties we need. Use the PasswordPropertyText attribute if you need to obscure the text in the adapter GUI.
[ConfigurationProperty("MyProperty", DefaultValue = "", IsRequired = true)]
[PasswordPropertyText(true)]
public string MyProperty
{
    get { return (string)this["MyProperty"]; }
    set { this["MyProperty"] = value; }
}
Next, we implement the abstract class BehaviorExtensionElement. In the BehaviorType method, we tell the configuration element which type of behavior it shall be.
public override Type BehaviorType
{
    get { return typeof(MyEndpointBehavior); }
}
In the CreateBehavior method, we create an instance of the endpoint behavior class, and initialize it with the configuration properties we implemented.
protected override object CreateBehavior()
{
    return new MyEndpointBehavior(MyProperty);
}
Step 6: Installation
As with service behaviors, endpoint behaviors can be installed globally or per BizTalk adapter. For global installation, follow these points:
Install the library to the GAC.
While targeting .NET Framework 4:
Edit machine.config for both 32 and 64 bit. The files are located here:
Register the component under the section <configuration><system.serviceModel><extensions><behaviorExtensions> with a <add name="" type=""/> tag:
Add the name of the behavior to the name property. In this example, the name is “MyEndpointBehavior”.
The Type property will be “MyEndpointBehaviorNamespace.MyEndpointBehaviorElement, EndpointBehaviorLib, Version=1.0.0.0, Culture=neutral, PublicKeyToken=null”, where “EndpointBehaviorLib” is the assembly name of the library, and “PublicKeyToken” should be set to the public key token given to the assembly after you sign it.
Restart the host instances that will run the library.
Endpoint behaviors can be installed per BizTalk adapter for the WCF-Custom, WCF-CustomIsolated and WCF-WebHttp adapters on BizTalk Server 2013 like so:
Install the library to the GAC.
Create a .config file, and let it contain the following, including the name and type description, equivalently to what it would have looked like if we added it to machine.config.
We must fill in name and type in the .config file.
Open the Adapter Handler Properties dialog box for the adapter that shall use the behavior. An endpoint behavior can be configured on both send and receive handlers.
The Adapter Handler Properties dialog box.
Open the Transport Properties dialog box.
The adapter Transport Properties dialog box.
Import the .config file in the Transport Properties dialog box.
Restart all running instances of the host (adapter handler, see Host name in the Adapter Handler Properties dialog box).
Step 7: Configure the behavior
The endpoint behavior can now be added to the Behavior tab of your receive location or send port, depending on whether you configured it on a send handler, receive handler or installed it globally in machine.config.
Configuring the WCF custom behavior.
After adding the behavior as an EndpointBehavior, you’ll be able to configure its properties in the Configuration section of the Behavior tab.
There are at least a couple of ways you can call a PowerShell script from a post-processing script when you install a BizTalk application using an MSI file. Note that up to and including BizTalk Server 2020, using a PowerShell script as a post-processing script is not supported: PostProcessing Script. I’ll first show you the quick and easy way of doing this while creating a traditional MSI, and then I’ll show you how you can adapt that to also work when you deploy your BizTalk application using Azure DevOps and the BizTalk Server Application Project.
On older versions of BizTalk Server, such as BizTalk Server 2013, you will need to have both Windows PowerShell 3.0/4.0 (depending on the OS) and Windows PowerShell 2.0 Engine installed to be able to execute PowerShell scripts from a post-processing script. On newer versions, such as BizTalk Server 2020, you only need to have Windows PowerShell 5.1 installed. If you have an older version of BizTalk Server, and you experience problems executing PowerShell scripts, try adding Windows PowerShell 2.0 Engine from the Add Roles and Features Wizard.
Add Windows PowerShell 2.0 Engine using the Add Roles and Features Wizard on older systems.
Traditional MSI
When you deploy a BizTalk application in the traditional way, using an MSI, you can include a PowerShell script as a file resource, and have your post-processing script call the PowerShell script.
Create the PowerShell script file. The name should be “<BizTalk application name>.ps1”. Replace <BizTalk application name> with the name of your BizTalk application.
Add the script code to the ps1 file. As an example, I’ll use a script that creates an event source in the Application log. In this example, "MyApplication" is the name of the BizTalk application.
$eventSource = "MyApplication"
if (![Diagnostics.EventLog]::SourceExists($eventSource))
{
    [Diagnostics.EventLog]::CreateEventSource($eventSource, "Application")
    [Diagnostics.EventLog]::WriteEntry($eventSource, "Event source $eventSource has been created.", [Diagnostics.EventLogEntryType]::Information)
}
else
{
    [Diagnostics.EventLog]::WriteEntry($eventSource, "Event source $eventSource already exists.", [Diagnostics.EventLogEntryType]::Information)
}
In the post-processing script, add the following commands to execute the PowerShell script. The post-processing script I’m using here is a .bat file.
@ECHO OFF
SETLOCAL ENABLEEXTENSIONS
CHCP 1252

IF "%BTAD_InstallMode%"=="Install" (
    PowerShell -NoProfile -ExecutionPolicy Bypass -Command "&'%BTAD_InstallDir%\%BTAD_ApplicationName%.ps1'"
)
In the BizTalk Server Administration Console, add the .bat file as a PostProcessingScript in the resources of your BizTalk application.
Add a post-processing script to your BizTalk application.
Add the ps1 file as a file resource. You can do that by right-clicking your BizTalk application, and choosing Resources… from the Add sub-menu. If done right, the ps1 file should be added as a resource with type System.BizTalk:File, and have destination location “%BTAD_InstallDir%\MyApplication.ps1”, assuming the name of the application is MyApplication.
Post-processing and PowerShell scripts added to the resources of a BizTalk application.
Export the BizTalk application as an MSI file from the BizTalk Server Administration Console, and make sure to include both the post-processing script and the PowerShell script.
Exporting an application as an MSI including post-processing and PowerShell scripts.
When you install the MSI on a BizTalk server, the PowerShell script will be stored in the destination location. The post-processing script will then be executed, which in turn will run the PowerShell script from the destination location.
The BizTalk Server Application Project Way
Now that we have a way to execute PowerShell scripts from a post-processing script, we can adapt that to work with the BizTalk Server Application Project.
The BizTalk Server Application Project is Microsoft’s attempt at creating a BizTalk deployment framework with native support in Azure DevOps. It shares several similarities with other frameworks, like the Deployment Framework for BizTalk (BTDF), but it also has its limitations, and one of them is the inability to set a destination location for resources. The files will end up in a sub-folder of the DevOps Agent. I guess a crafty script guru could locate the PowerShell script and execute it from there, but there’s a much better way of handling this shortcoming of the BizTalk Server Application Project. And here’s how you do it:
Edit the post-processing script, and have it create the PowerShell script in a known location. This makes it easy for the post-processing script to execute the PowerShell script. We also make sure to clean up after us. This approach has an advantage in this specific example in that the script doesn’t need to know the name of your BizTalk application upfront, which makes it easier to reuse the script.
@ECHO OFF
SETLOCAL ENABLEEXTENSIONS
CHCP 1252

IF "%BTAD_InstallMode%"=="Install" (
    IF "%BTAD_ChangeRequestAction%"=="Update" (
        >"%WINDIR%\Temp\%BTAD_ApplicationName%.ps1" ECHO $eventSource = "%BTAD_ApplicationName%"
        >>"%WINDIR%\Temp\%BTAD_ApplicationName%.ps1" ECHO if (![Diagnostics.EventLog]::SourceExists($eventSource^)^)
        >>"%WINDIR%\Temp\%BTAD_ApplicationName%.ps1" ECHO {
        >>"%WINDIR%\Temp\%BTAD_ApplicationName%.ps1" ECHO     [Diagnostics.EventLog]::CreateEventSource($eventSource, "Application"^)
        >>"%WINDIR%\Temp\%BTAD_ApplicationName%.ps1" ECHO     [Diagnostics.EventLog]::WriteEntry($eventSource, "Event source $eventSource has been created.", [Diagnostics.EventLogEntryType]::Information^)
        >>"%WINDIR%\Temp\%BTAD_ApplicationName%.ps1" ECHO }
        >>"%WINDIR%\Temp\%BTAD_ApplicationName%.ps1" ECHO else
        >>"%WINDIR%\Temp\%BTAD_ApplicationName%.ps1" ECHO {
        >>"%WINDIR%\Temp\%BTAD_ApplicationName%.ps1" ECHO     [Diagnostics.EventLog]::WriteEntry($eventSource, "Event source $eventSource already exists.", [Diagnostics.EventLogEntryType]::Information^)
        >>"%WINDIR%\Temp\%BTAD_ApplicationName%.ps1" ECHO }
        PowerShell -NoProfile -ExecutionPolicy Bypass -Command "&'%WINDIR%\Temp\%BTAD_ApplicationName%.ps1'"
        IF EXIST "%WINDIR%\Temp\%BTAD_ApplicationName%.ps1" DEL "%WINDIR%\Temp\%BTAD_ApplicationName%.ps1"
    )
)
Include the post-processing script in the BizTalkServerInventory.json file of the BizTalk Server Application Project.
Create build and release pipelines in Azure DevOps. This also requires that you install the DevOps Agent on the BizTalk server where you intend to deploy your BizTalk application. The details of how to do this is outside the scope of this blog article.
When you run the release pipeline in Azure DevOps, the BizTalk application will be deployed to the specified BizTalk server, and an MSI file will be generated in the “_work\MSIShare” folder of the DevOps Agent on the BizTalk server. This MSI file will contain the post-processing script. When you install this MSI file on the BizTalk server, the post-processing script will be executed, which in turn will create a PowerShell script file in the specified location, execute it, and finally delete the PowerShell script file.